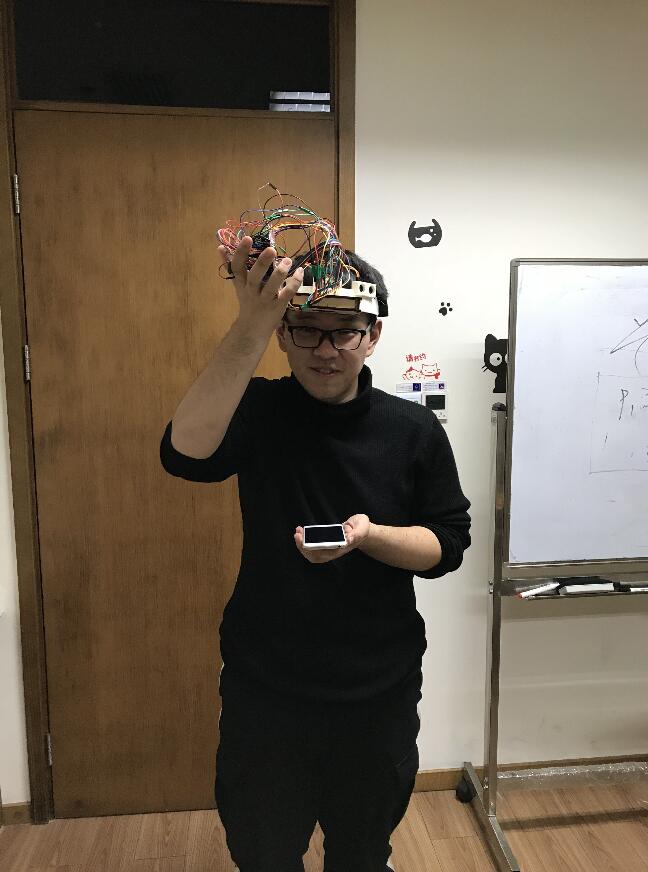
Berg Hat
Week 1: The beginning of the Output Circuit
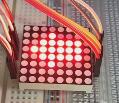
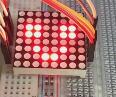
How to connect Led Matrix LD-1088BS
High voltage is at the Column leg and low voltage is at the Row leg so that a certain led will be on.
Due to the limited number of output ports from the arduino(12 can be used), I just use the inner 6*6 leds to output the directions.
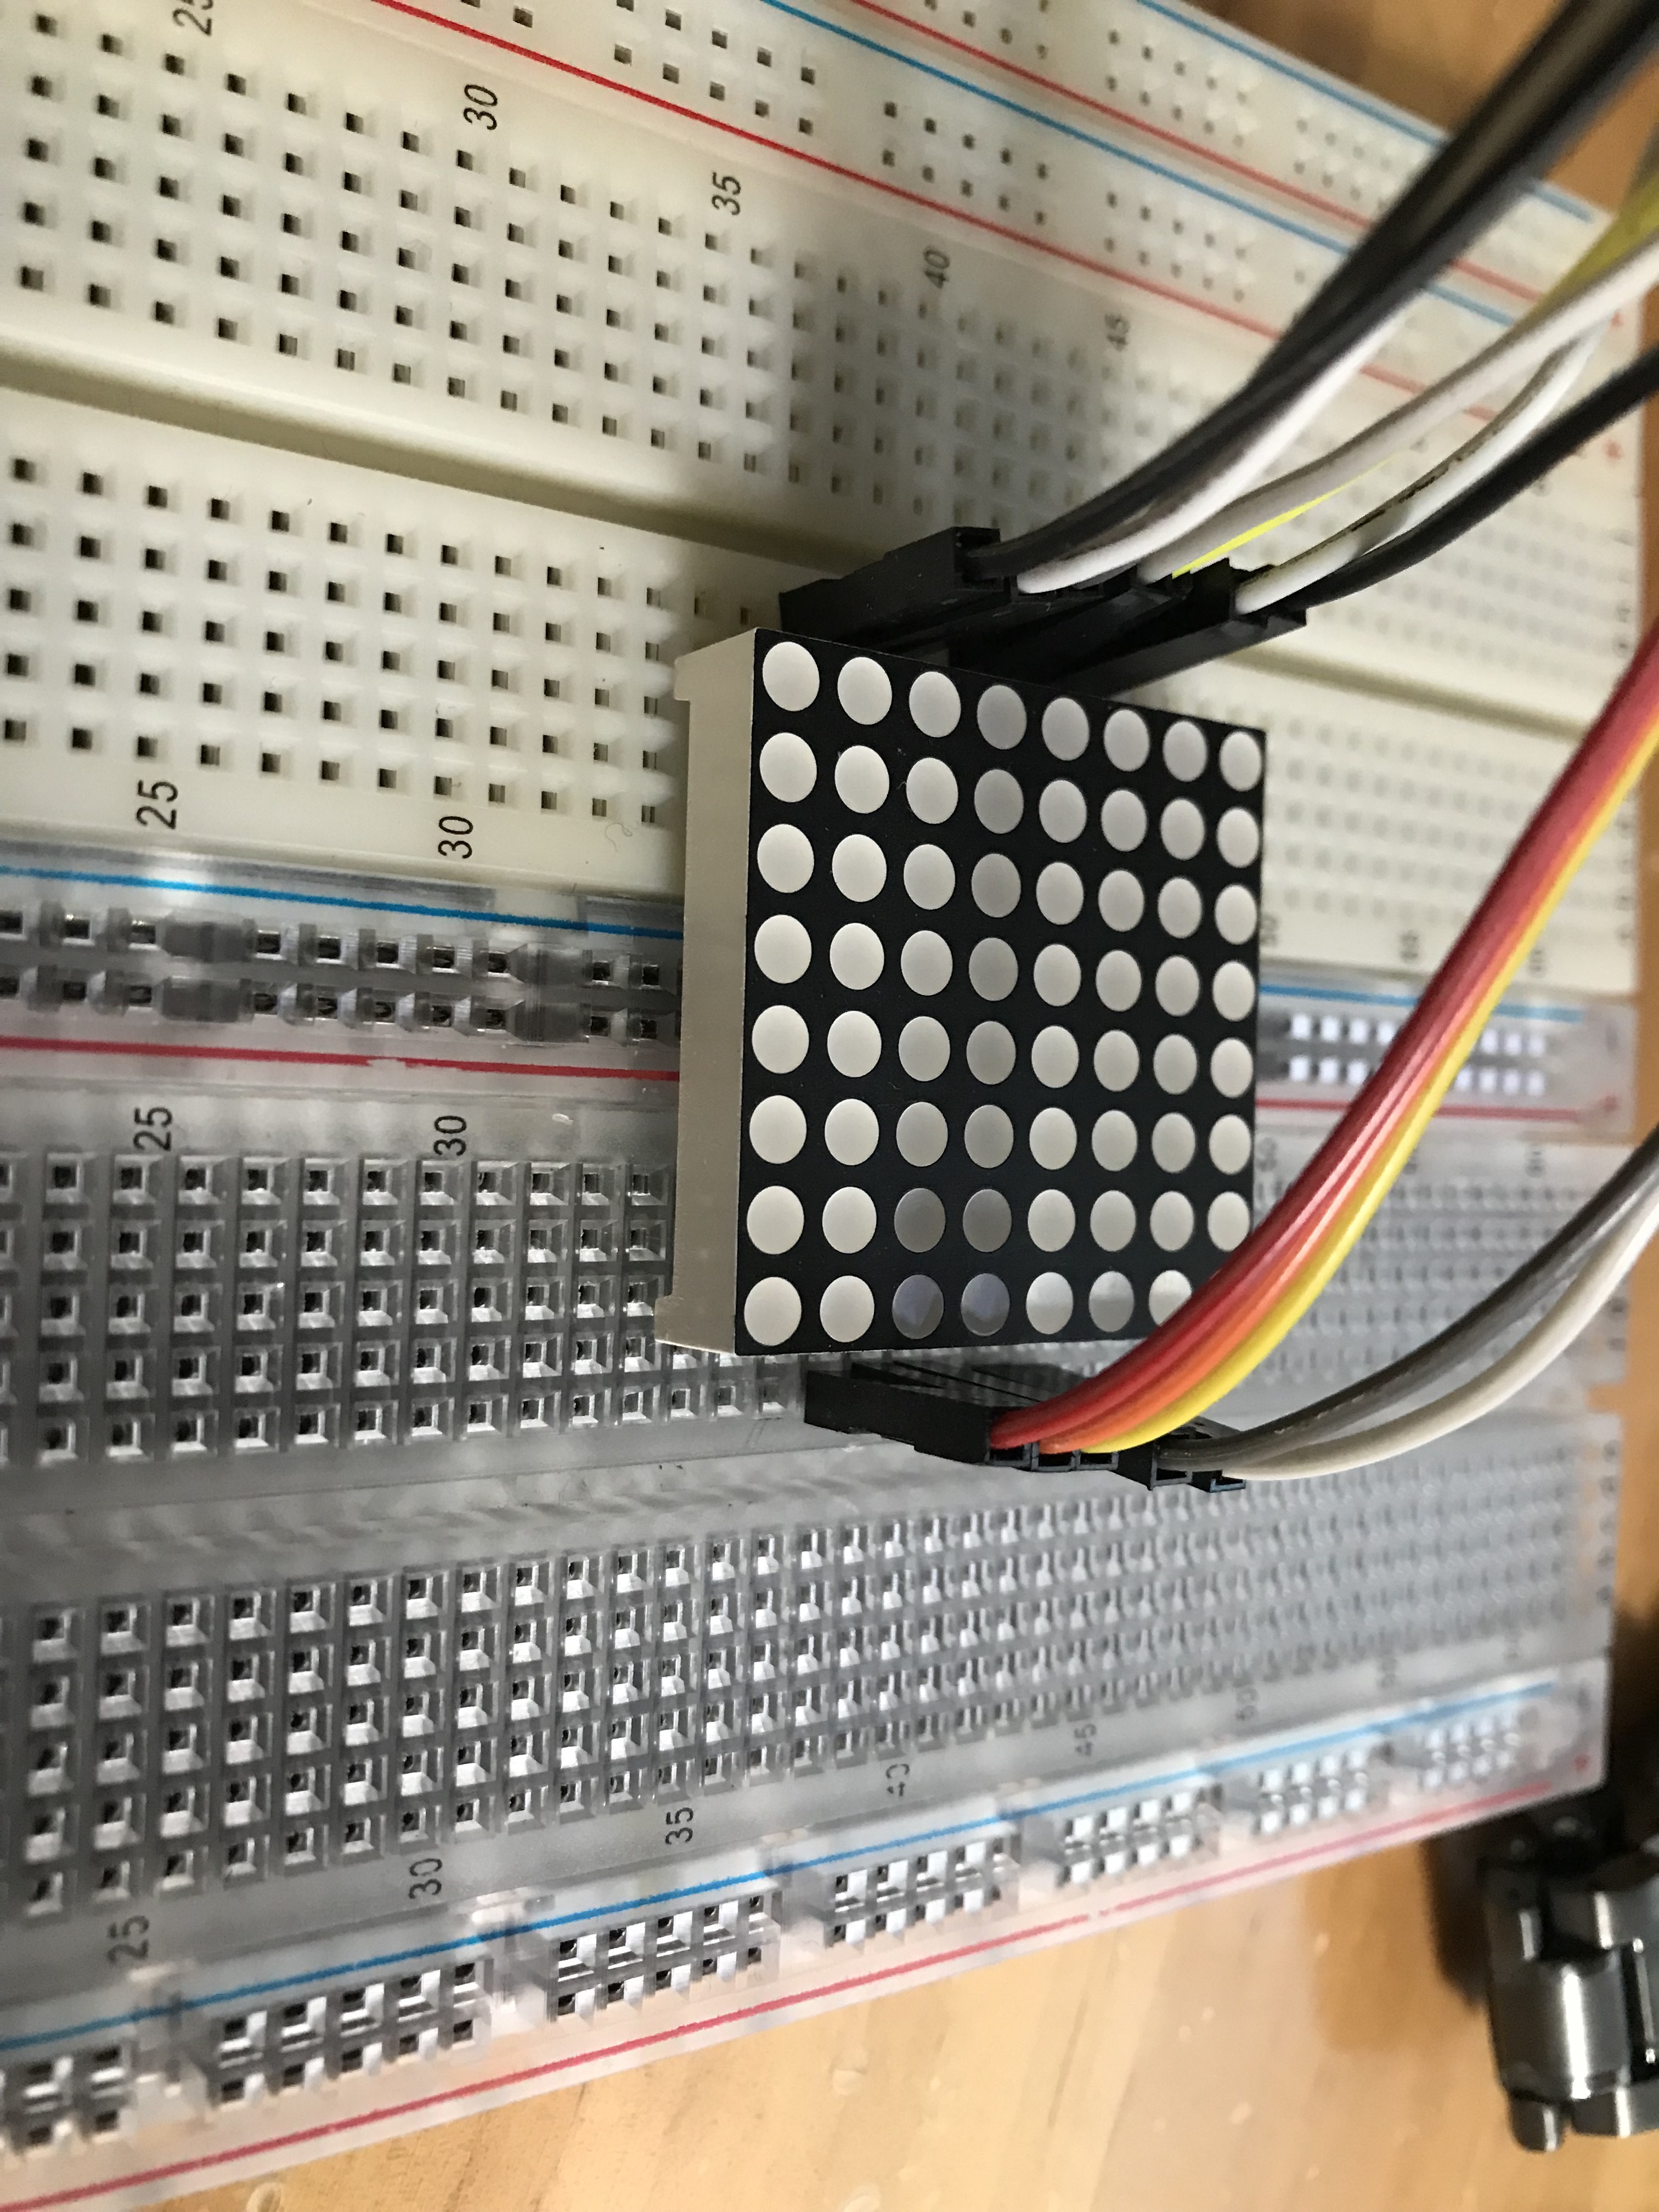
First give every output port a name and bind it to the leg of led matrix.
Because of the characteristic of the led matrix, it's hard to light a picture through the leds and it's very easy to light a whole rectangle on the matrix .Then I search on the internet to get some ideas.After that, I succeed.
How to light a picture through the led matrix

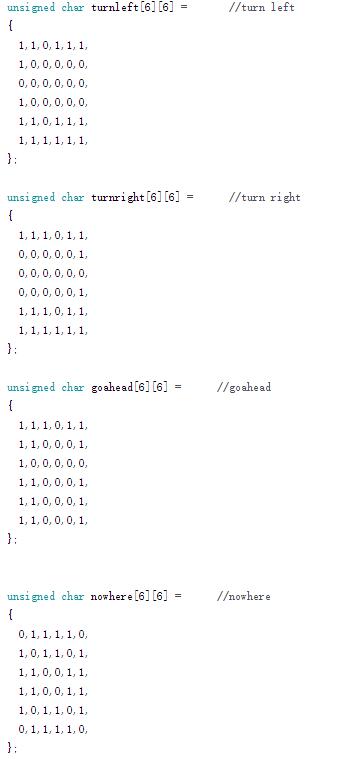
This part is the code of pictures , 1 represents that the led id off and 0 represents that the led is on.
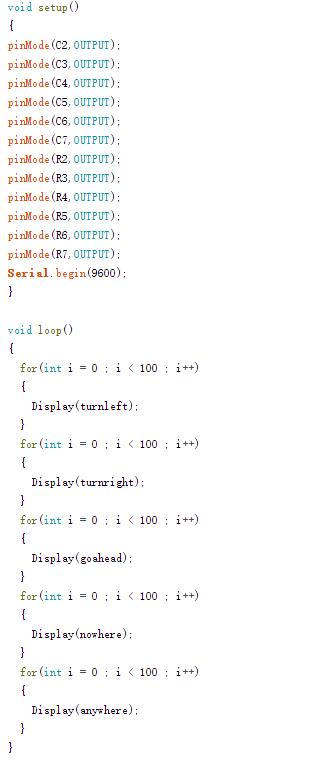
This part is the init of the putput port and the test code of the led pictures.
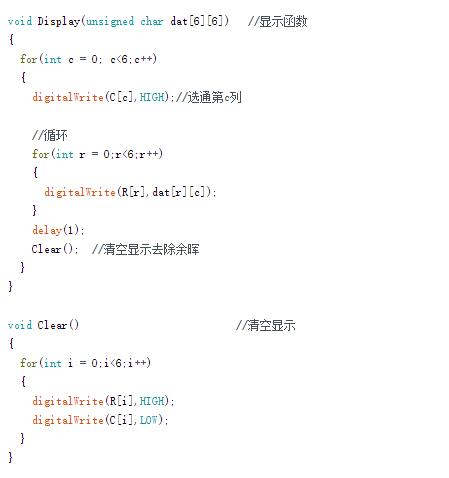
This part is the display funciton which is used to display a certain picture and the clear function to clear the display.
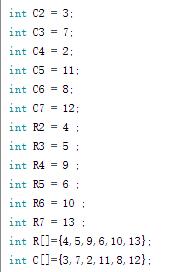
int C2 = 3;
int C3 = 7;
int C4 = 2;
int C5 = 11;
int C6 = 8;
int C7 = 12;
int R2 = 4 ;
int R3 = 5 ;
int R4 = 9 ;
int R5 = 6 ;
int R6 = 10 ;
int R7 = 13 ;
int R[]={4,5,9,6,10,13};
int C[]={3,7,2,11,8,12};

unsigned char turnleft[6][6] =       //turn left
{
  1,1,0,1,1,1,
  1,0,0,0,0,0,
  0,0,0,0,0,0,
  1,0,0,0,0,0,
  1,1,0,1,1,1,
  1,1,1,1,1,1,
};

unsigned char turnright[6][6] =      //turn right
{
  1,1,1,0,1,1,
  0,0,0,0,0,1,
  0,0,0,0,0,0,
  0,0,0,0,0,1,
  1,1,1,0,1,1,
  1,1,1,1,1,1,
};

unsigned char goahead[6][6] =      //goahead
{
  1,1,1,0,1,1,
  1,1,0,0,0,1,
  1,0,0,0,0,0,
  1,1,0,0,0,1,
  1,1,0,0,0,1,
  1,1,0,0,0,1,
};


unsigned char nowhere[6][6] =      //nowhere
{
  0,1,1,1,1,0,
  1,0,1,1,0,1,
  1,1,0,0,1,1,
  1,1,0,0,1,1,
  1,0,1,1,0,1,
  0,1,1,1,1,0,
};
unsigned char anywhere[6][6] =      //anywhere
{
  1,1,1,1,1,1,
  0,0,1,1,0,0,
  0,0,1,1,0,0,
  1,1,1,1,1,1,
  1,0,1,1,0,1,
  1,1,0,0,1,1,
};

void setup()
{
pinMode(C2,OUTPUT);
pinMode(C3,OUTPUT);
pinMode(C4,OUTPUT);
pinMode(C5,OUTPUT);
pinMode(C6,OUTPUT);
pinMode(C7,OUTPUT);
pinMode(R2,OUTPUT);
pinMode(R3,OUTPUT);
pinMode(R4,OUTPUT);
pinMode(R5,OUTPUT);
pinMode(R6,OUTPUT);
pinMode(R7,OUTPUT);
Serial.begin(9600);
}

void loop()

{
int left = analogRead(A0);
delay(1);
int right = analogRead(A1);
delay(1);
int front = analogRead(A2);
delay(1);
int Left = left * 5 / 1023;
int Right = right * 5 / 1023;
int Front = front * 5 / 1023;
Serial.println(Left);
Serial.println(Right);
Serial.println(Front);

if (Right < 2 && Left < 2 && Front < 2)
{
    for(int i = 0 ; i < 200 ; i++)
  {
    Display(nowhere);
  }
}

if (Left > 2 && Right > 2 && Front > 2)
  {
      for(int i = 0 ; i < 200 ; i++)
   {
      Display(anywhere);
   }

  }
  else{
    if (Left > 2)
    {
            for(int i = 0 ; i < 200 ; i++)
   {
      Display(turnleft);
   }
    }
    else{
      if(Right > 2)
      {
              for(int i = 0 ; i < 200 ; i++)
   {
      Display(turnright);
   }
      }
      else{
              for(int i = 0 ; i < 200 ; i++)
   {
      Display(nowhere);
   }
      }
    }
  }
}

  /*for(int i = 0 ; i < 100 ; i++)
  {
    Display(turnleft);
  }
  for(int i = 0 ; i < 100 ; i++)
  {
    Display(turnright);
  }
  for(int i = 0 ; i < 100 ; i++)
  {
    Display(goahead);
  }
  for(int i = 0 ; i < 100 ; i++)
  {
    Display(nowhere);
  }
  for(int i = 0 ; i < 100 ; i++)
  {
    Display(anywhere);
  }*/


void Display(unsigned char dat[6][6])   //显示函数
{
  for(int c = 0; c<6;c++)
  {
    digitalWrite(C[c],HIGH);//选通第c列

    //循环
    for(int r = 0;r<6;r++)
    {
      digitalWrite(R[r],dat[r][c]);
    }
    delay(1);
    Clear();  //清空显示去除余晖
  }
}

void Clear()                          //清空显示
{
  for(int i = 0;i<6;i++)
  {
    digitalWrite(R[i],HIGH);
    digitalWrite(C[i],LOW);
  }
}
Week 2 :The combination of I/O and the adjustment of the circuit
In the class, the teacher told us that we can use a 74HC595 Shift Register to light the whole LED Matrix instead of using two arduino
How to light a heart with 74HC595*2 Shift Register and a arduino
const int echopin=A0; // echo接5端口
const int trigpin=4; // trig接4端口  左侧超声波测距器


const int echopin2=A1;
const int trigpin2=2;// 右侧超声波测距器


const int echopin3=A2;
const int trigpin3=7;// 前方超声波测距器
float F,R,L ;

 int ColDataInput = 8;
 int ColConfirm = 9;
 int ColData = 10;

int RowDataInput = 11;
int RowConfirm = 12;
int RowData = 13;

void setup()
{
  Serial.begin(9600);
  pinMode(echopin,INPUT); //设定echo为输入模式
  pinMode(trigpin,OUTPUT);//设定trig为输出模式
  pinMode(echopin2,INPUT);
  pinMode(trigpin2,OUTPUT);
  pinMode(echopin3,INPUT);
  pinMode(trigpin3,OUTPUT);
  pinMode(8,OUTPUT);
  pinMode(9,OUTPUT);
  pinMode(10,OUTPUT);

  pinMode(11, OUTPUT);
   pinMode(12, OUTPUT);
   pinMode(13, OUTPUT);


}
void ConfirmRowDataInput()
 {
   digitalWrite(RowDataInput, HIGH);
   digitalWrite(RowDataInput, LOW);
 }

void ConfirmRowDataAll()
 {
   digitalWrite(RowConfirm, HIGH);
   digitalWrite(RowConfirm, LOW);
 }

void ConfirmColDataInput()
 {
   digitalWrite(ColDataInput, HIGH);
   digitalWrite(ColDataInput, LOW);
 }

void ConfirmColDataAll()
 {
   digitalWrite(ColConfirm, HIGH);
   digitalWrite(ColConfirm, LOW);
 }

void SelectRow(int ID)
 {
   for (int i = 1; i <= 8; i++)
   {
     if (i == ID)
     {
       digitalWrite(RowData, LOW);
     }
     else
     {
       digitalWrite(RowData, HIGH);
     }

    ConfirmRowDataInput();

  }
   ConfirmRowDataAll();
 }

void SelectCol(char Data[8])
 {
   for (int i = 0; i < 8; i++)
   {
     if (Data[i] == '0')
       digitalWrite(ColData, LOW);
     else
       digitalWrite(ColData, HIGH);
     ConfirmColDataInput();
   }
  ConfirmColDataAll();
 }

void ClearAll()
 {
   for (int i = 1; i <= 8; i++)
   {
     digitalWrite(RowData, HIGH);
     ConfirmRowDataInput();
   }
   ConfirmRowDataAll();

  for (int i = 1; i <= 8; i++)
   {
     digitalWrite(ColData, LOW);
     ConfirmColDataInput();
   }
   ConfirmColDataAll();

}

void turnLeft()
 {
   ClearAll();
   SelectRow(1);
   SelectCol("00010000");
   delay(1);

  ClearAll();
   SelectRow(2);
   SelectCol("00110000");
   delay(1);

  ClearAll();
   SelectRow(3);
   SelectCol("01011111");
   delay(1);

  ClearAll();
   SelectRow(4);
   SelectCol("10000001");
   delay(1);

  ClearAll();
   SelectRow(5);
   SelectCol("10000001");
   delay(1);

  ClearAll();
   SelectRow(6);
   SelectCol("01011111");
   delay(1);

  ClearAll();
   SelectRow(7);
   SelectCol("00110000");
   delay(1);


  ClearAll();
   SelectRow(8);
   SelectCol("00010000");
   delay(1);
}

void turnRight()
 {
   ClearAll();
   SelectRow(1);
   SelectCol("00001000");
   delay(1);

  ClearAll();
   SelectRow(2);
   SelectCol("00001100");
   delay(1);

  ClearAll();
   SelectRow(3);
   SelectCol("11111010");
   delay(1);

  ClearAll();
   SelectRow(4);
   SelectCol("10000001");
   delay(1);

  ClearAll();
   SelectRow(5);
   SelectCol("10000001");
   delay(1);

  ClearAll();
   SelectRow(6);
   SelectCol("11111010");
   delay(1);

  ClearAll();
   SelectRow(7);
   SelectCol("00001100");
   delay(1);


  ClearAll();
   SelectRow(8);
   SelectCol("00001000");
   delay(1);
}


void nowhere()
 {
   ClearAll();
   SelectRow(1);
   SelectCol("10000001");
   delay(1);

  ClearAll();
   SelectRow(2);
   SelectCol("01000010");
   delay(1);

  ClearAll();
   SelectRow(3);
   SelectCol("00100100");
   delay(1);

  ClearAll();
   SelectRow(4);
   SelectCol("00011000");
   delay(1);

  ClearAll();
   SelectRow(5);
   SelectCol("00011000");
   delay(1);

  ClearAll();
   SelectRow(6);
   SelectCol("00100100");
   delay(1);

  ClearAll();
   SelectRow(7);
   SelectCol("01000010");
   delay(1);


  ClearAll();
   SelectRow(8);
   SelectCol("10000001");
   delay(1);
}

void everywhere()
 {
   ClearAll();
   SelectRow(1);
   SelectCol("11100111");
   delay(1);

  ClearAll();
   SelectRow(2);
   SelectCol("10100101");
   delay(1);

  ClearAll();
   SelectRow(3);
   SelectCol("11100111");
   delay(1);

  ClearAll();
   SelectRow(4);
   SelectCol("00000000");
   delay(1);

  ClearAll();
   SelectRow(5);
   SelectCol("00000000");
   delay(1);

  ClearAll();
   SelectRow(6);
   SelectCol("10000001");
   delay(1);

  ClearAll();
   SelectRow(7);
   SelectCol("01000010");
   delay(1);


  ClearAll();
   SelectRow(8);
   SelectCol("00111100");
   delay(1);
}
void loop()
{
  // *********************************** 左方测距******/
  digitalWrite(trigpin,LOW);
  delayMicroseconds(2);
  digitalWrite(trigpin,HIGH);
  delayMicroseconds(10);
  digitalWrite(trigpin,LOW); //发一个10ms的高脉冲去触发TrigPin
  float distanceL = pulseIn(echopin,HIGH);//接收高电平时间
  distanceL = distanceL/58.0;//计算距离
        if (distanceL > 400)
  {
    distanceL = L;
  }
  else{
    L = distanceL;
  }
  Serial.println(distanceL);


/*******************右方测距******************************************/

  digitalWrite(trigpin2,LOW);
  delayMicroseconds(2);
  digitalWrite(trigpin2,HIGH);
  delayMicroseconds(10);
  digitalWrite(trigpin2,LOW); //发一个10ms的高脉冲去触发TrigPin
  float distanceR = pulseIn(echopin2,HIGH);//接收高电平时间
  distanceR = distanceR/58.0;//计算距离
        if (distanceR > 400)
  {
    distanceR = R;
  }
  else{
    R = distanceR;
  }
  Serial.println(distanceR);

// *******************前方测距********************************************/
  digitalWrite(trigpin3,LOW);
  delayMicroseconds(2);
  digitalWrite(trigpin3,HIGH);
  delayMicroseconds(10);
  digitalWrite(trigpin3,LOW); //发一个10ms的高脉冲去触发TrigPin
  float distanceF = pulseIn(echopin3,HIGH);//接收高电平时间
  distanceF = distanceF/58.0;//计算距离

    if (distanceF > 400)
  {
    distanceF = F;
  }
  else{
    F = distanceF;
  }


 Serial.println(distanceF);
  if (distanceF <=50){
    if (distanceL>distanceR){
      if(distanceL<40){
  for (int i = 0 ; i < 200 ; i++)
  {
    nowhere();
  }
        }else{
  for (int i = 0 ; i < 200 ; i++)
  {
    turnLeft();
  }
        }
    }else{
      if(distanceR<40){
  for (int i = 0 ; i < 200 ; i++)
  {
    nowhere();
  }
        }else{
  for (int i = 0 ; i < 200 ; i++)
  {
    turnRight();
  }
        }
    }
  }
  else{
  for (int i = 0 ; i < 200 ; i++)
  {
    everywhere();
  }
  }
ClearAll();
delay(100);

}
Week 3-4 :3D printing and laser cut for the "Berg Hat" and some improvement
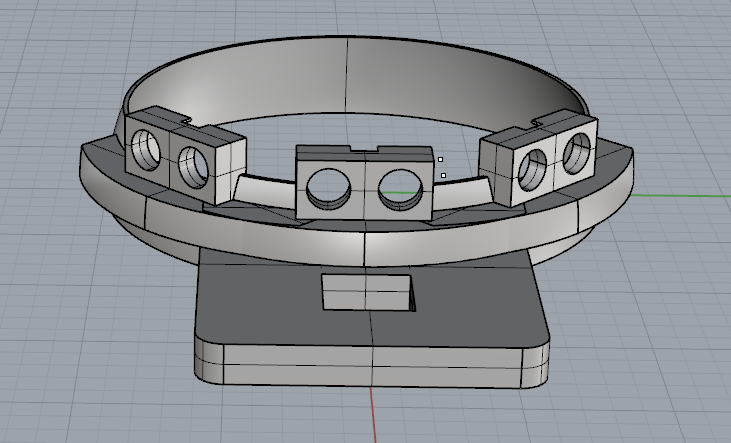
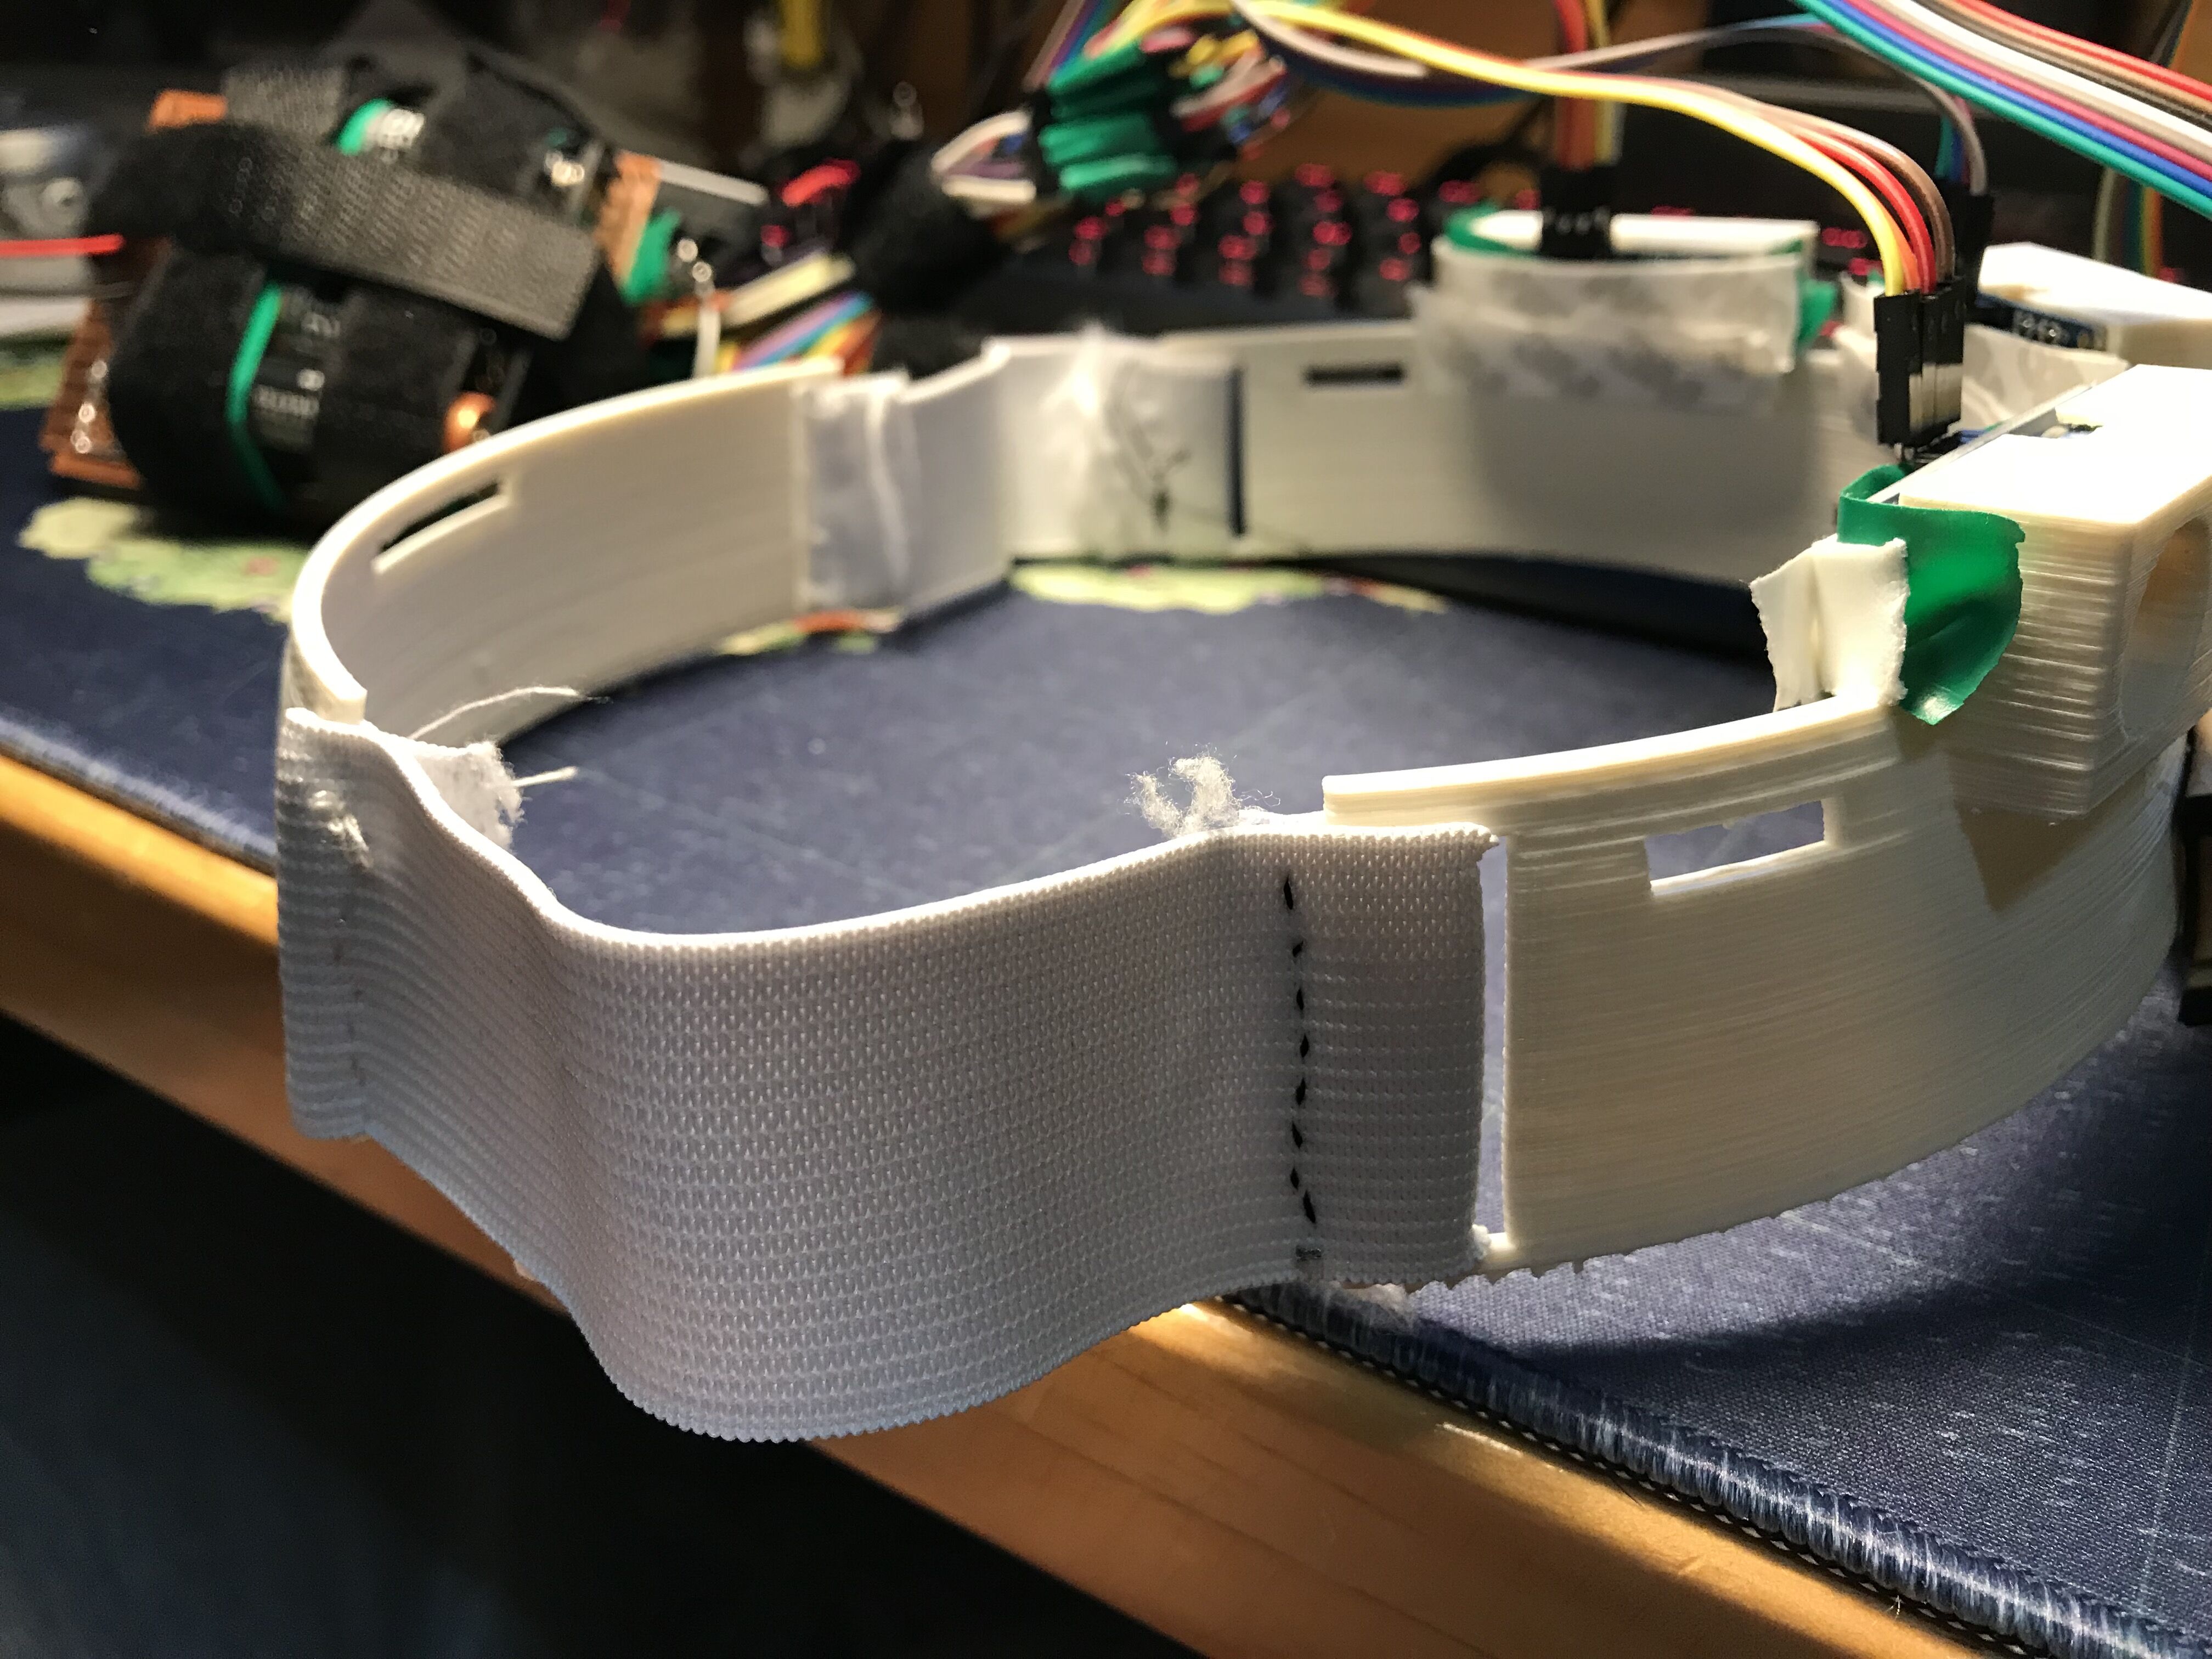
The picture shows the first verison of the hat. The size , however, is limited .As the result, we decided to use a rubber band to make it adjustable so as to fit everyone.Due to the efficiency, we choose the laser cut as an alternative of the brim of a hat (The combination of ABS and Wood seems cool.).
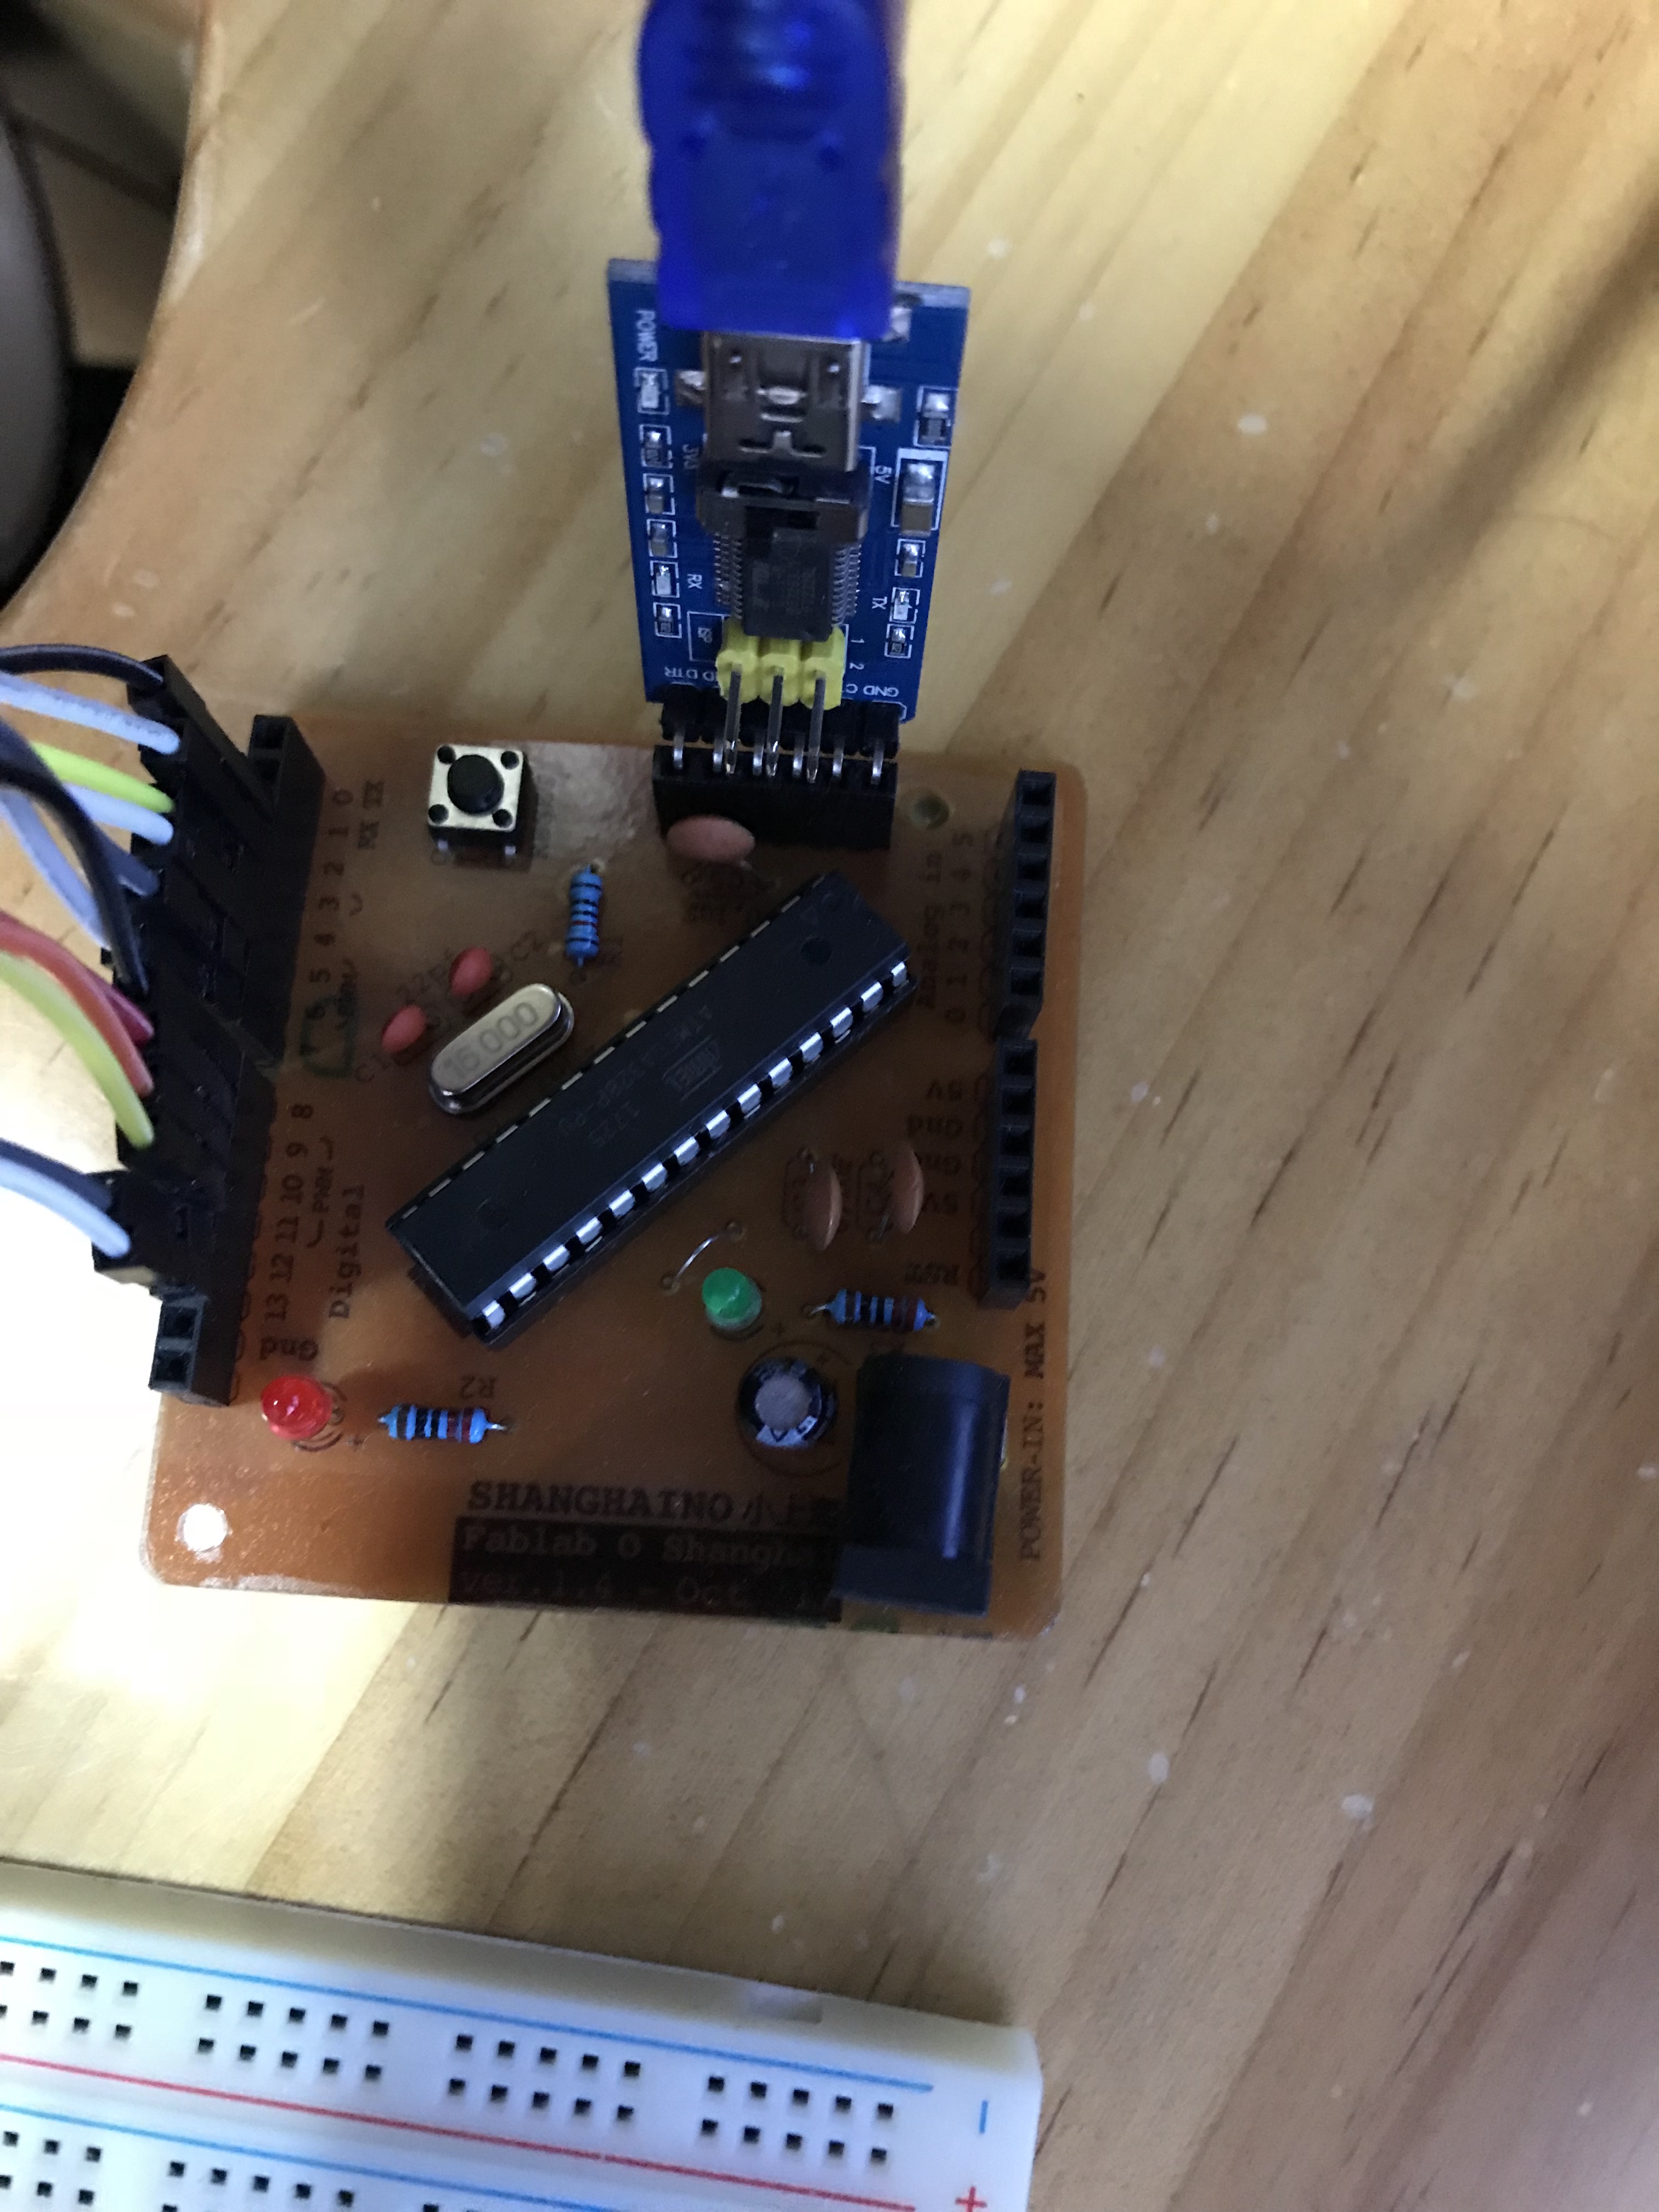
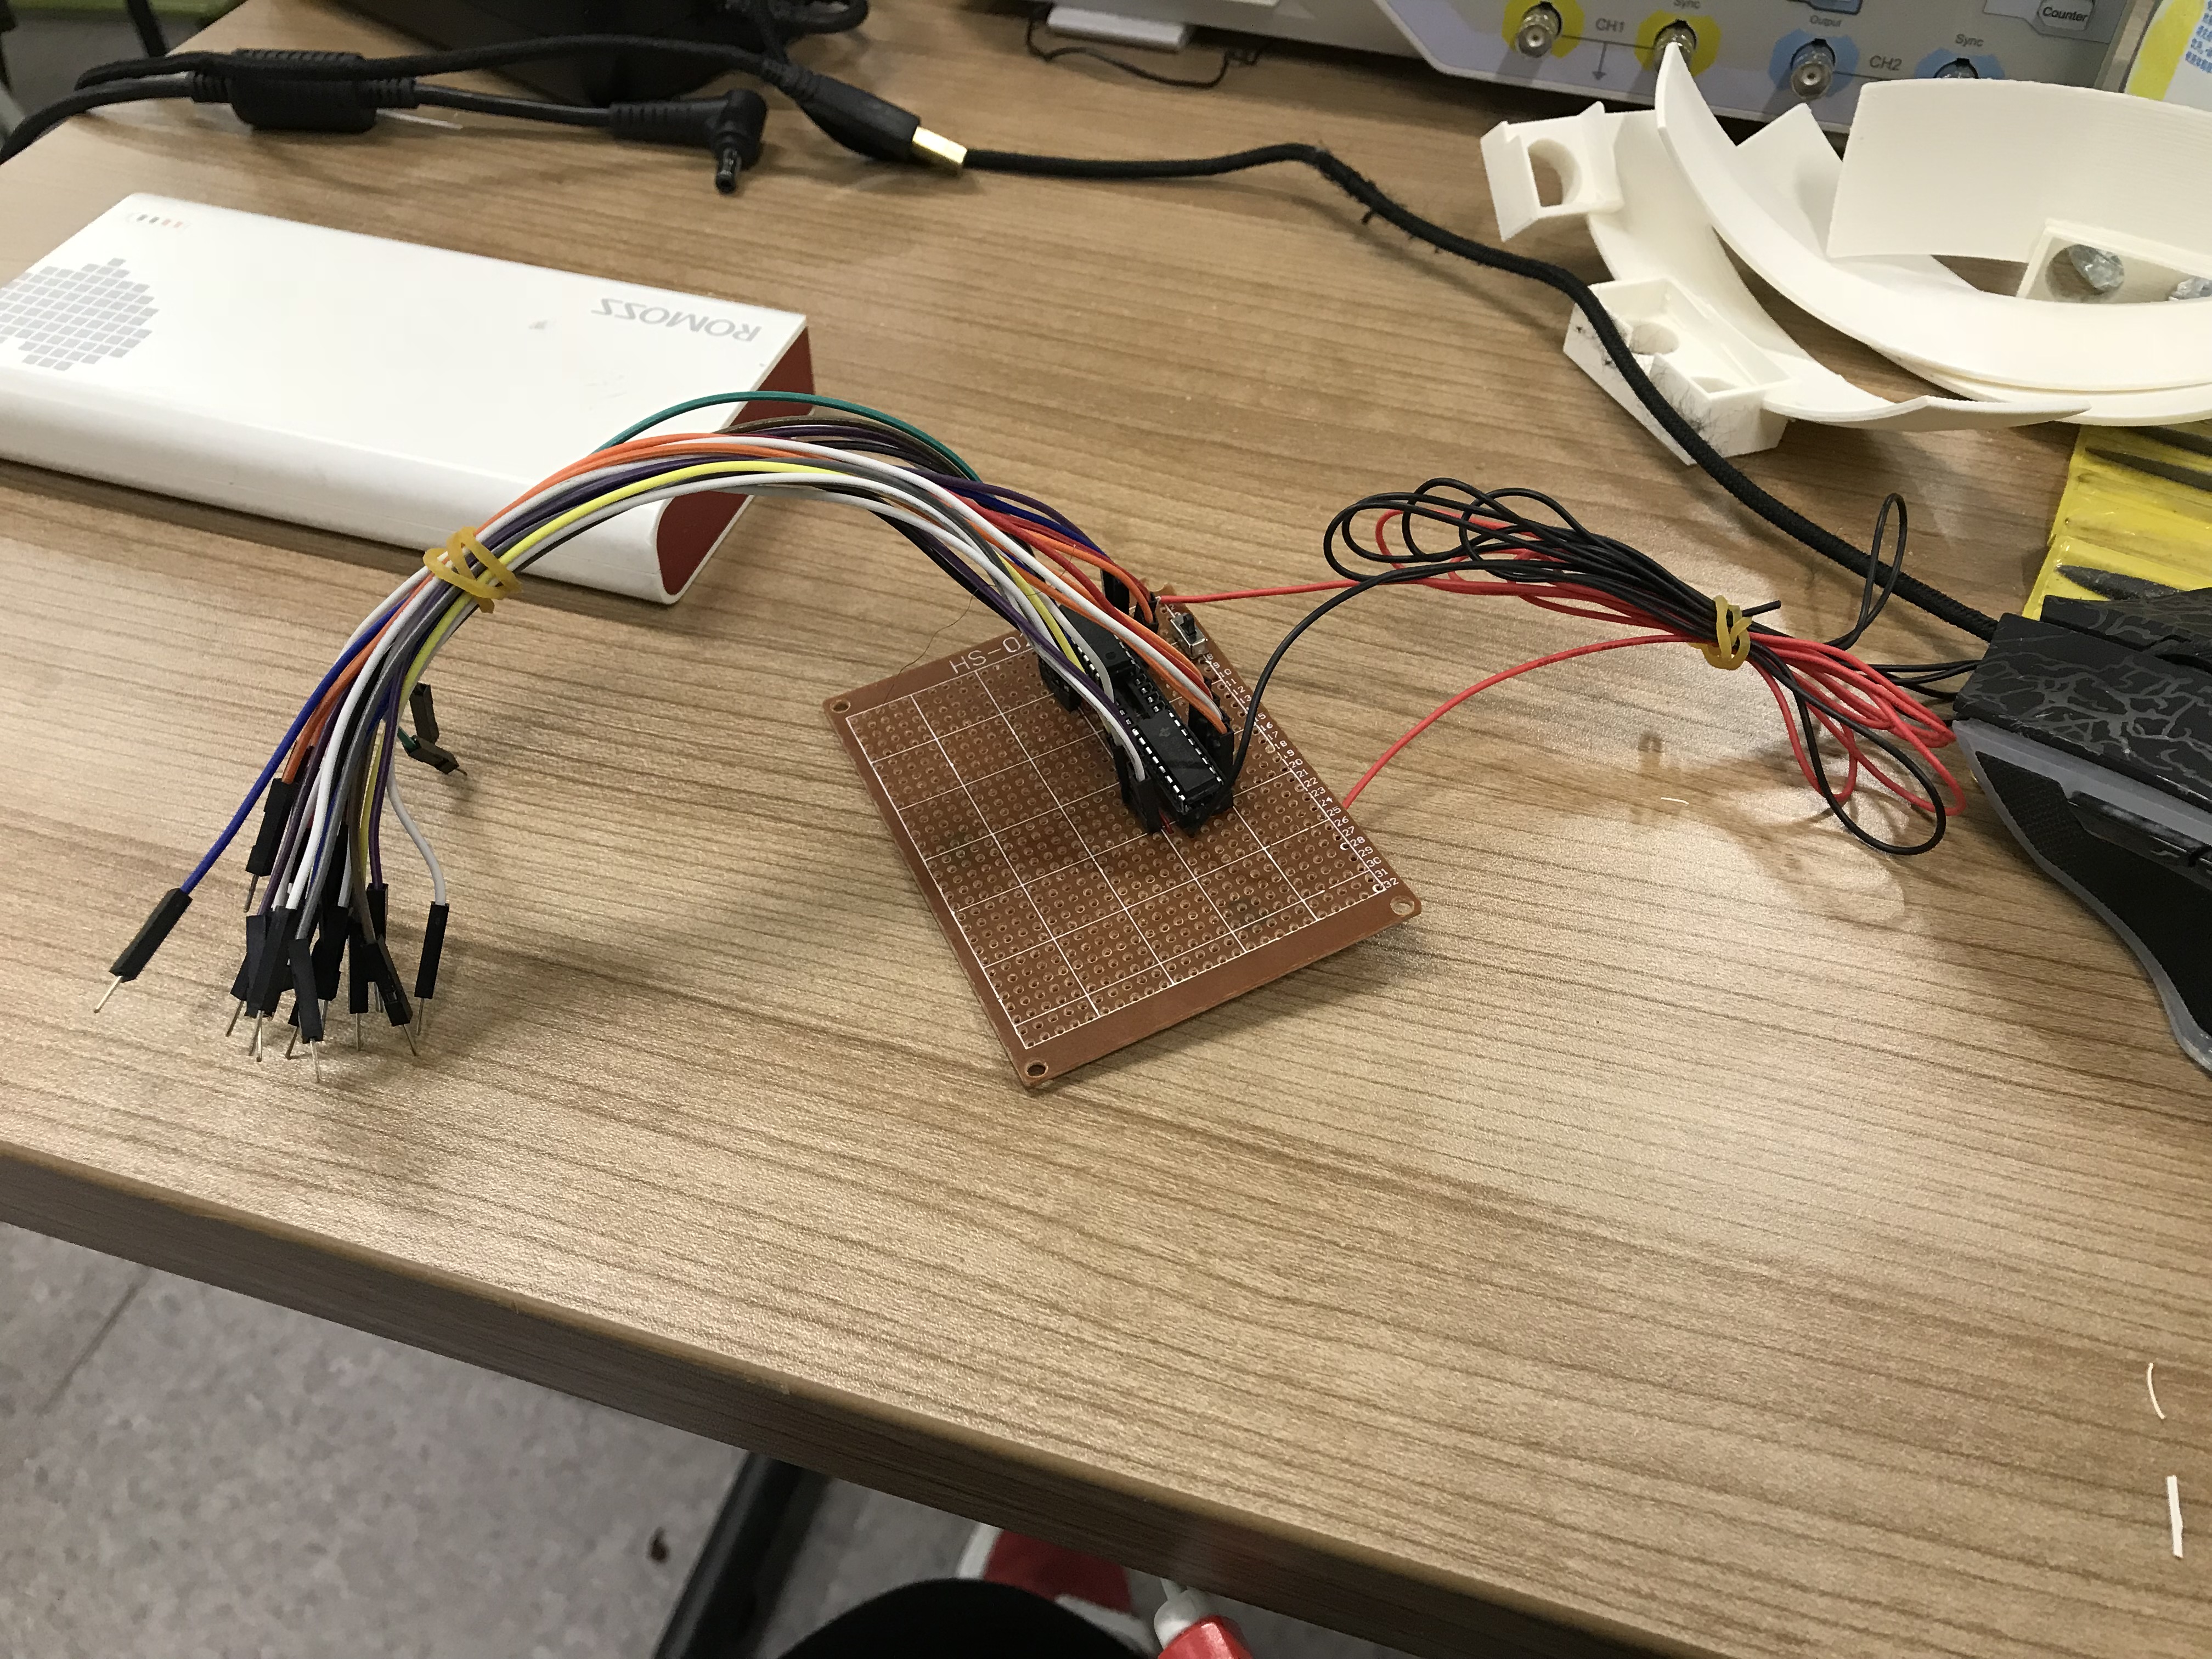
Also , to make the size smaller so that it can be wearable , we use a copper-clad plate to load part of our circuit instead of a breadbord.
To hide the copper-clad plate and the arduino , we make a round box to hold almost all of them.
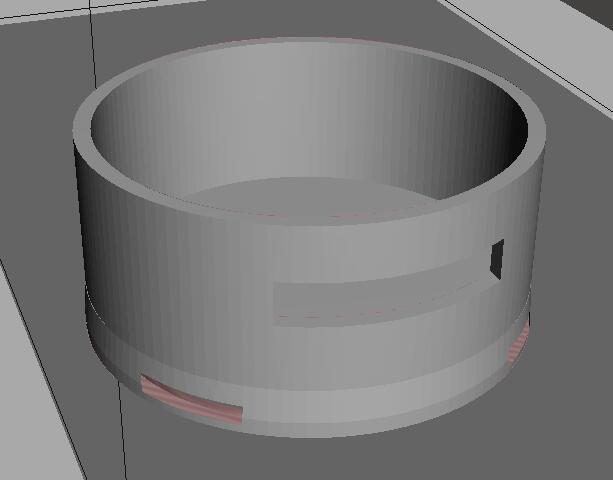
The pre-final product (without a top box)
And the reflection of the LED Matrix